Search the Community
Showing results for tags 'trim'.
-
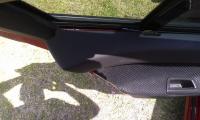
Im new to the whole vinyl wrapping thing. But here is my basic how to on covering the faded lower window trims on the B-series cars. What you will need: -Vinyl wrap that is at least 100cm wide x at least 10cm -Hair dryer or heat gun -Scissors -Butter knife or something similar -Rag -Wax and grease remover or similar -Phillips head screwdriver -Pin First step is to remove the trim. This is easy. Open the door and you will see right on the back edge there is a small screw, remove this. Now lift up the trim piece from the rear gently and the 2 clips should come off easily, then slide the trim piece rearwards to pull the front of it from underneth the mirror trim. With the trim removed its time to clean it up. I washed mine with a rag and hot water to remove the bulk of the dirt then a quick wipe with wax and grease remover to finish it off. Once wiped down with wax and grease remover avoid touching the cleaned surface. Now cut the wrap to size. The trim peice is about 94cm long and narrow so I cut my 100cm peice at 5.5cm wide.The extra width is to wrap the vinyl around the trim behind it giving the vinyl more to grip onto. With the trim on a nice flat surface facing up, pull the backing sheet from the vinyl off completely. I found it was easier this way then trying to leave part of the backing sheet on. I applied the wrap from one side to the other leaving about 3cm of overhang on the end and even amounts of overhang on the top and bottom of the trim. As I was slowly placing the wrap on the trim I used 3 fingers in a pinch like position to press the vinyl firmly onto the trim. This technique for me produced no bubbles. Leave the overhanging vinyl for the moment. It needs to be trimmed up a bit first before wrapping it around the back of the trim. This is how your peice should look when placed upside down on bench. Below is how I trimmed mine. With the vinyl trimmed up to size now comes the tricky part. Wrapping around the edges. Start with one edge and grab the vinyl and gently pull it over the edge of the trim them push it down bit by bit from one end to the other. Repeat on the other edge. I then used a butter knife run along the inside of the trim to press it down. I then wrapped the ends and pressed it down firmly. Now grab the hairdryer or heat gun and go over the whole trim, paying extra attention to the edges of the vinyl. The heat shrinks the vinyl. Any bubbles in the surface of the wrap can be fixed by pin pricking the centre of the bubble then waving the hairdryer/heat gun over the bubble till it disappears. My first trim had a few bubbles that were easily fixed but my second one turned out perfect with the above technique used. If you think youve applied the wrap wrong, its crocked its easily pulled up and reapplied. Finished product To reinstall the trim its just the reverse of the removal process. Push the front edge of the trim gently under the mirror trim ever so slightly. Then gently push the trim down till it clips into the door. Then put the screw back in. A 100x50cm carbon vinyl wrap cost me 13bucks delivered so theres about 10 attempts there Remember this is my first time ever wrapping anything and more experienced people (henz) will probably correct anything that should be done differently.
- 11 replies
-
- 6
-
-
- #henzisthebest
- vinyl
-
(and 3 more)
Tagged with:
-
Hey guys. This has really been frustrating me. So I took both the rare door trims out of my xr6T FG which was easy and perfectly fine. but when I try to put it back on the it just does'nt clip on properly and sticks slightly open from the top. (Photos attached). It just feels like some things touching somewhere. But I did spent hours but could'nt figure it out. However I have taken the front trims out and did'nt have any problems putting those back on. Do I need to put my window down while doing it or something. Let me know if you guys have faced similar issues or if there is any logic or trick behind this. Help much appreciated guys.Thanks