Search the Community
Showing results for tags 'Lowering'.
-
Hey Lads, New to this site, looks awesome Just over 12 months ago I traded in my 2011 FG2 XR6 N/A in on a VF2 SS. Very bad decision and long story short I'm now back to a 2013 FG2 XR6 N/A. My old XR6 was an ex Highway Patrol in WA, which meant it was a tad lower than stock. I want my new XR6 to be the same as it was a good height for it to look good and just a bit different however it wasn't too low. I do a lot of country driving for work and one of the highways is terrible I think I'll bottom out if I get it too low. I have a feeling my old falcon was only lowered in the back however I remember I always had to go sideways down kerbs because the front would always scrape so I'm not too sure. I know it had king springs on it but I don't know if it had upgraded shocks too or not. My old one looked mean from the back and you could tell the difference between mine and a stock one quite easily. A setup I have been thinking about is the King springs Lowered EHD Coils KFRL-68SSLHD? without shocks just in the rear and leave the front? I think they're meant to be 30mm lower than stock? What you guys think? I would like to avoid the shocks if possible just because I'm not looking to spend heaps. Just chasing some advice on what the setup may have been and whether I do need to get shocks as well or not. Cheers Guys
- 5 replies
-
- suspension
- lower
-
(and 11 more)
Tagged with:
-
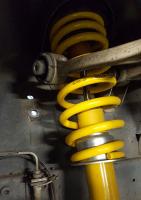
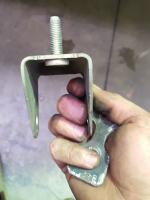
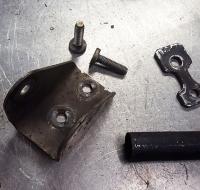
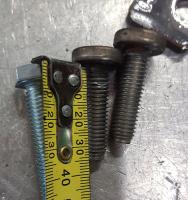
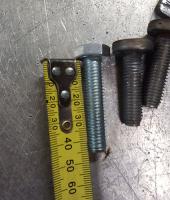
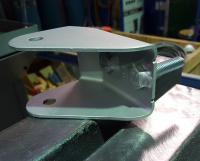
Most people take their lowered XR6 in for a wheel alignment and are informed that there's not enough room left on the camber bolts for the amount of shims required to adjust the camber back to factory specs. I was in the same boat, I've lowered the front of my FG ute using SSSL springs and then it's another 8mm lower again because I have Bilstein shocks with the spring installed on the lowest of the 3 settings. HTG measurement is around 335mm (which fills the guard perfectly). My camber was around -2.5° so I needed 1.5° of adjustment to bring it back to -1.0° Now I only had around 10mm left on the upper control arm bracket bolts. The figure for adjustment (from Superpro) is ~9mm of shims = 1° of adjustment. This means I would need around 13.5mm of shims installed to correct the camber. The bolts were not long enough obviously, any suspension shop would say "you need a camber kit". Superpro make a camber kit which is "designed to allow Camber Adjustment on Standard Height & XR Ride Height Vehicles only." The kit is around $100 and you need two kits per vehicle so that's 200 bucks. Each kit comes with 2 brackets, 3x 6mm, 2x 3mm and 4x 1.6mm shims BUT you need to put 1x each shim on EACH bracket for the kit to be the same as standard. So really you're only getting 1x 6mm, 0x 3mm and 2x 1.6mm for adjustment. How am I supposed to install 2x 13.5mm of shims per side with only 1x 6mm shim and 2x 1.6mm shims? The kit might be preferable for a suspension shop which has extra shims they can use but you've just basically forked out $200 for some brackets with longer bolts and no change to the camber (and I'm not sure just how much longer the bolts are after putting 1 of each shim back on?). I ended up going the DIY option which is installing longer bolts into the standard brackets. It's easy, costs $3-$5 for 8x M10x45mm bolts and only took an hour or so. First you need to remove the brackets from the car. I have a hoist but its easy to do on jack stands just remove the wheel, undo 2 bolts on the upper control arm then undo the 4 bolts in the engine bay and the 2 brackets will come out. Check the condition of your upper control arm bushes, mine were stuffed. Make sure you take note of previously installed shims and their positions. 1 bracket removed This is the bracket, that's a shim. Now, find a bit of heavy wall pipe that fits over the head of the bolt and put the pipe in a vice. Position the bolt head on the pipe and hit the bolt through with a hammer. The bolts are fusion welded onto the bracket but come out pretty easily. You'll need to clean up the welds so the new bolts sit flush. That's a 5mm shim on the right. Length of old bolt is 35mm Length of new bolt is 45mm (M10 bolts btw) Now you can either just place bolt through or you can weld them in to make them easier to do up in the vehicle. I welded my bolts in and a quick coat of paint. After that it's just reassembly making sure to put the shims in their original positions. I milled up some 12.5mm shims out of alluminium which you can see behind the factory shim in this pic. I still need to get a wheel alignment but this should help cut down the amount of adjustment required. Shims are pretty easy to make, if they don't need to be removed easily just use some flat bar in whatever thickness you want and drill 2 holes.. easy. Your wheel alignment place will have shims anyway. The Superpro shims are made to easily slot in without removing the bracket. That's all there is to it.. hope it helps save forking out $200
-
Looking at putting 1.5-2" lowering blocks in the back end. It's a 2008 fg xr6 turbo. I'm unsure if I have to change shocks and a few other things, and I've also heard that it doesn't do no good to the tail shaft


