hjtrbo
-
Posts
328 -
Joined
-
Last visited
-
Days Won
20
Content Type
Profiles
Forums
Gallery
Events
Store
Articles
Media Demo
Everything posted by hjtrbo
-
Just when you think things are going well...
-
Loving the youtube 101 videos. I sent Puff an embarrassing PM the other day where we went back and forward for what seemed like hours where he was slapping his head on the keyboard trying to tell me the pistons are offset. I would have sworn they wern't and had no idea what the hell he was going on about. Eventually I found out what that meant. Embarrassed? You bet! For those that come across this thread in the future and you're screwing an engine together for the first time and have good mechanical aptitude but are just lacking in the engine assembly knowledge department, I can assure there are some little things that can bite you. Piston offset, piston ring top and bottom hardness differences (I.e. getting in the rhythm on the ring file for the top set then realise the bottom set are way softer!), not sealing certain bolts are some just to name a few. I came across this series of videos. He goes into extreme detail, example 30mins just to show how to place a crankshaft into the block. A little long in places but overall perfect for those starting out. A recommended watch. Engine Building Part 2 - Gapping Rings, Installing Pistons in a 350 Chevy - YouTube Engine Building Part 3: Installing Crankshafts - YouTube Engine Building Part 4: Pistons, Rings, and Rods - YouTube Engine Building Part 5: Camshafts - YouTube Engine Building Part 6: Cylinder Heads - YouTube
-
Thanks mate. Using Inventor. For some reason way back at the start I didn't get on the Solid Works band wagon and have been regretting it ever since. I have so much time invested in learning Inventor that I'm not swapping now. Space is at a premium in the shop. Currently got an order out to get another bay put on so I can get a 4 post hoist in. Running out of room to store my cars
-
Nice. I haven't read your whole thread yet but did you have water meth on this?
-

BF Mk 2, not unopened anymore, not stock turbo anymore
hjtrbo replied to Tom Tucker's topic in 600+ Club
Wild colour. Get them head lights painted too. -
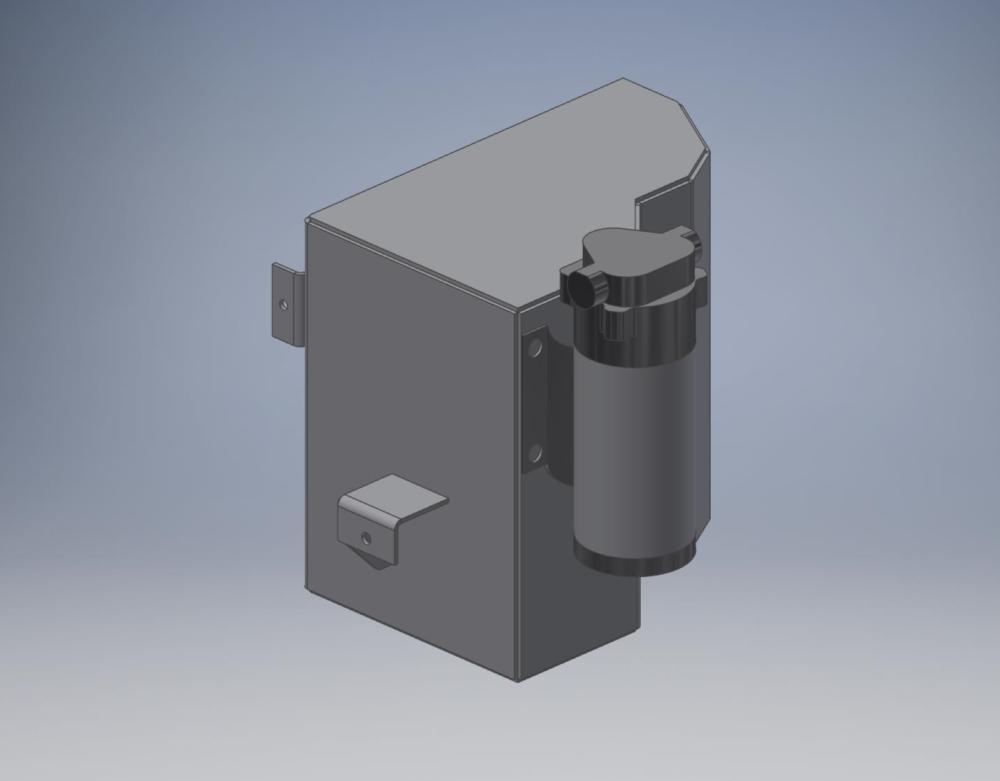
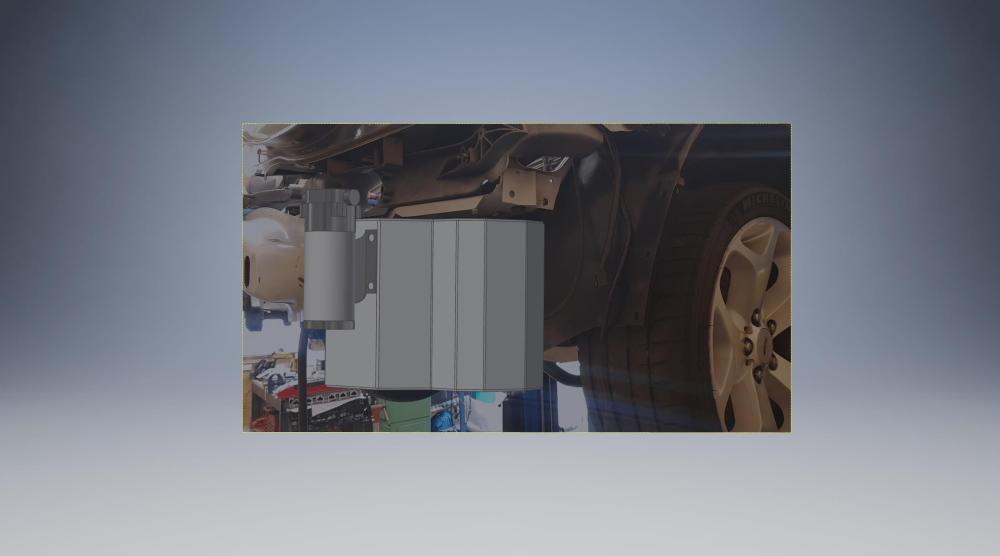
Time for a custom meth tank. Got 11 litres so far. Once its laser cut and I've got it bent and tacked up I'll see if I can add some more shapes to increase the capacity. It picks up the factory mounting points for the washer bottle so should be a bolt in installation. I left enough room rearward of the fog light to still replace the globe without having to take the tank out. The tank will also supply the window washer pump. I haven't worked out the fill piping yet, will need the tank installed as it's an intricate set of bends to get it to where the factory washer bottle fill point is in the engine bay. I'm adding in the mounts for the common Aquamist style pump so it should be reasonably universal across different meth kits. Will also have bungs for level switch and outlet plumbing. The windscreen washer pump will be roughly in the same place so there will be no modification required there to the factory wiring or plumbing. Once I've got it dialled in I'll be making these available for sale. Will be cost price plus some beer money. Should suit all FG-FG2 XR6. Maybe others if the washer bottle is the same part number all the way through. I left plenty of clearance around the bar and fog light to give it the best chance of being universal across as many models as possible.
-
So not like this then ‘An injustice all the way’: Dad’s anger after knocking out motorist with golf club in north Adelaide | 7NEWS
-
BF Mk 2, not unopened anymore, not stock turbo anymore
hjtrbo replied to Tom Tucker's topic in 600+ Club
+1 -
Same mob as last week. Might be time to take over a 7 iron and see what's up 😈
-
Agreed. When you get the new converter a good way to find a start point for lock up is do 2 power runs from very low rpms. One unlocked and the other fully locked. The rpm point where the power lines intersect is roughly where you want to start the lockup or just a smidge before. That nets you the best gains of torque multiplication to start with then 100% converter efficiency out the back. You may be even to lock up in 3rd... The timeslip will let you know . Wish you lived out my way, would love to see it at the Calder Friday night drags.
-
Low load lockup in the tall gear is a good strategy. Its what I do for every mate in there fully sick VE and VFs. The hard part is the getting the drag tune right. E.g. you might leave it unlocked 1 through 3, then not long after the 4th shift get her to pull down for the run out the back. Takes a bit to get it crisp.
-
Probably telling you how to suck eggs here.... Just ignore me if I am. Circle D triple disc. I do notice the ZF runs a continuous slip strategy. I did find a table that zeros out the slip but the results were varied. There are a few other tables I found that I posted about in my zf thread over on the pcmtec forum that I reckon you'd use. You'd need to specify OE woven frictions on par with what they do with there GM converters so that you don't get shudder and also can handle the long slip duration into lockup.
-
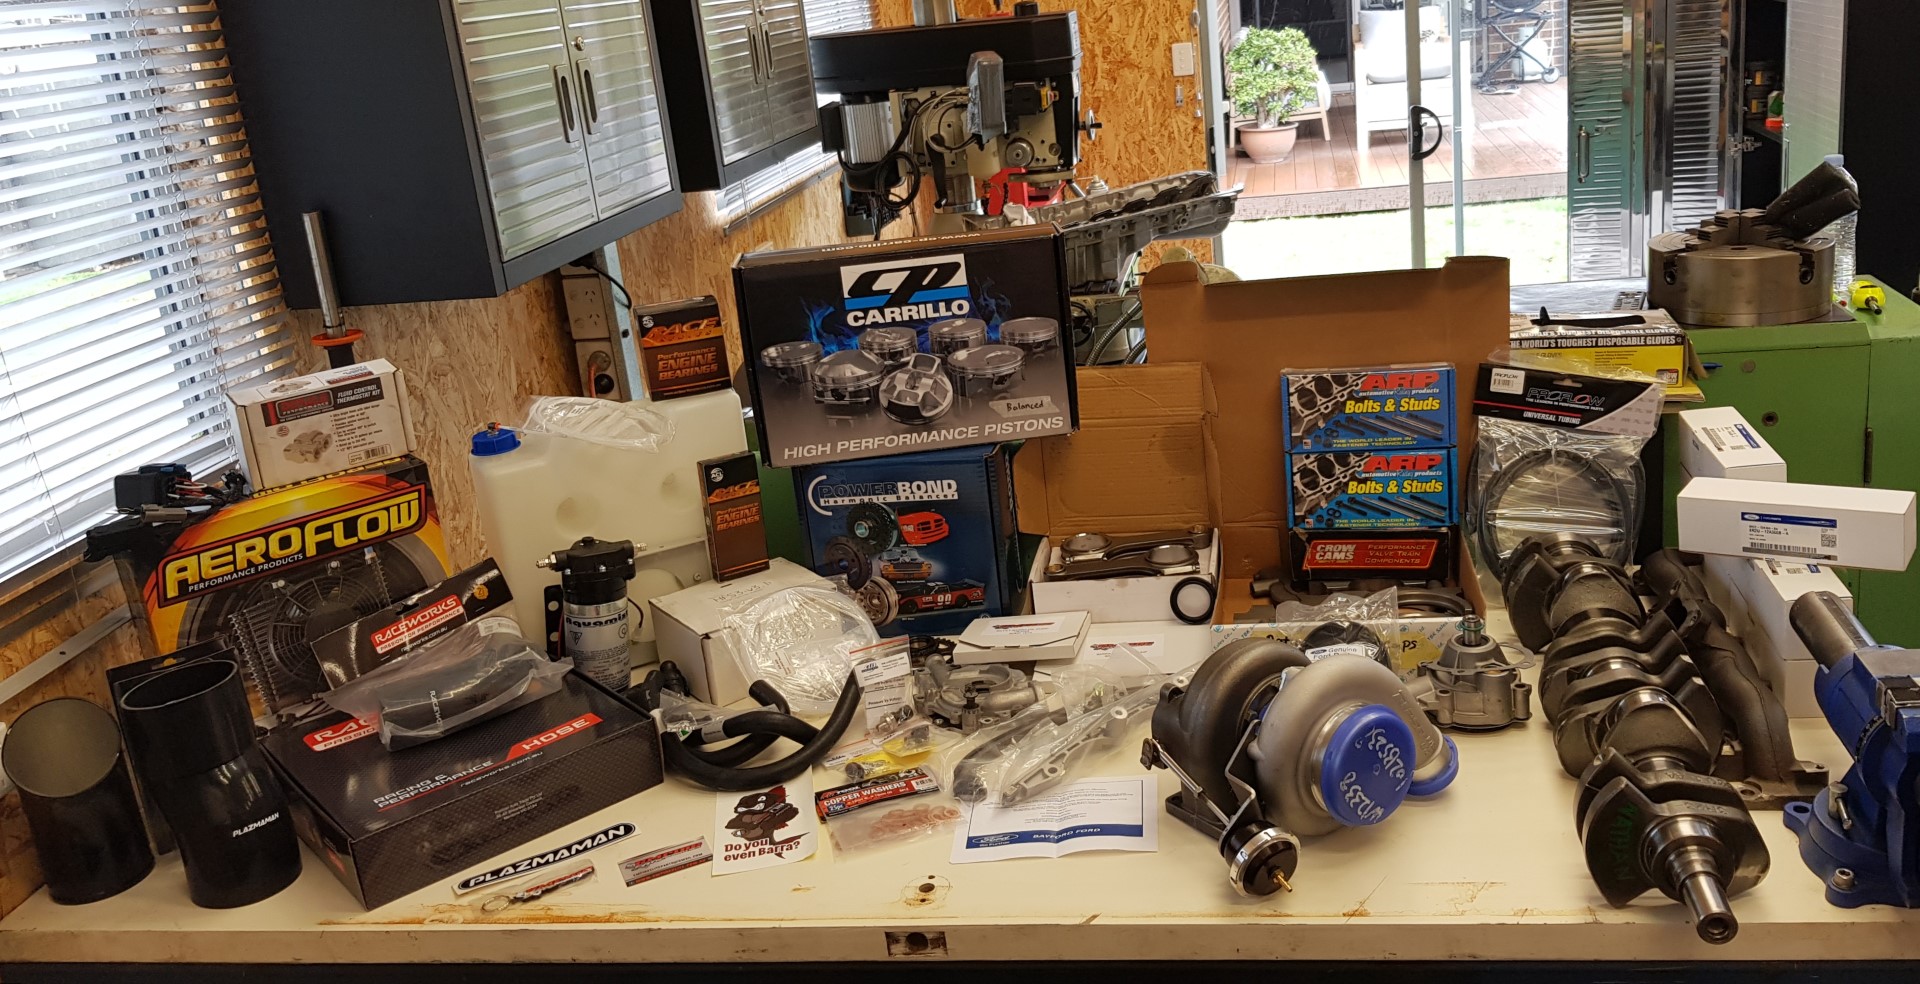
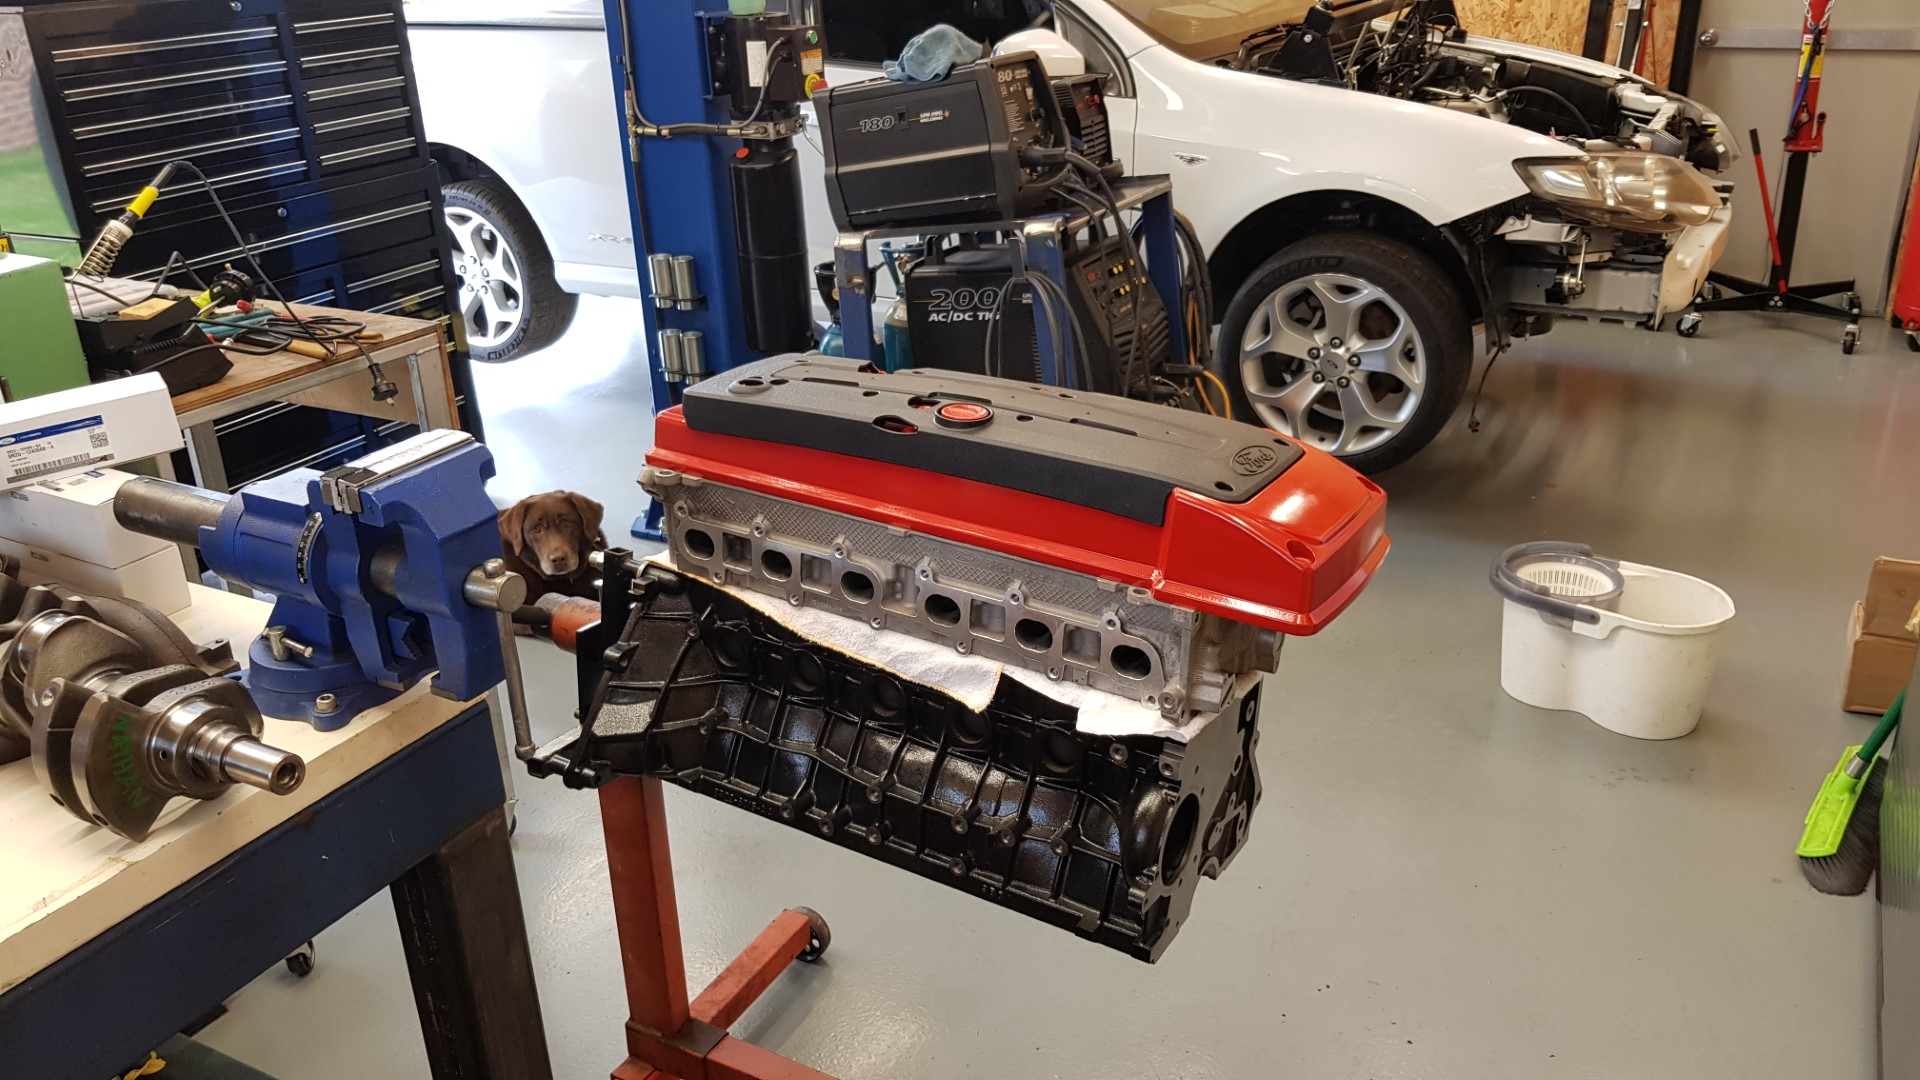
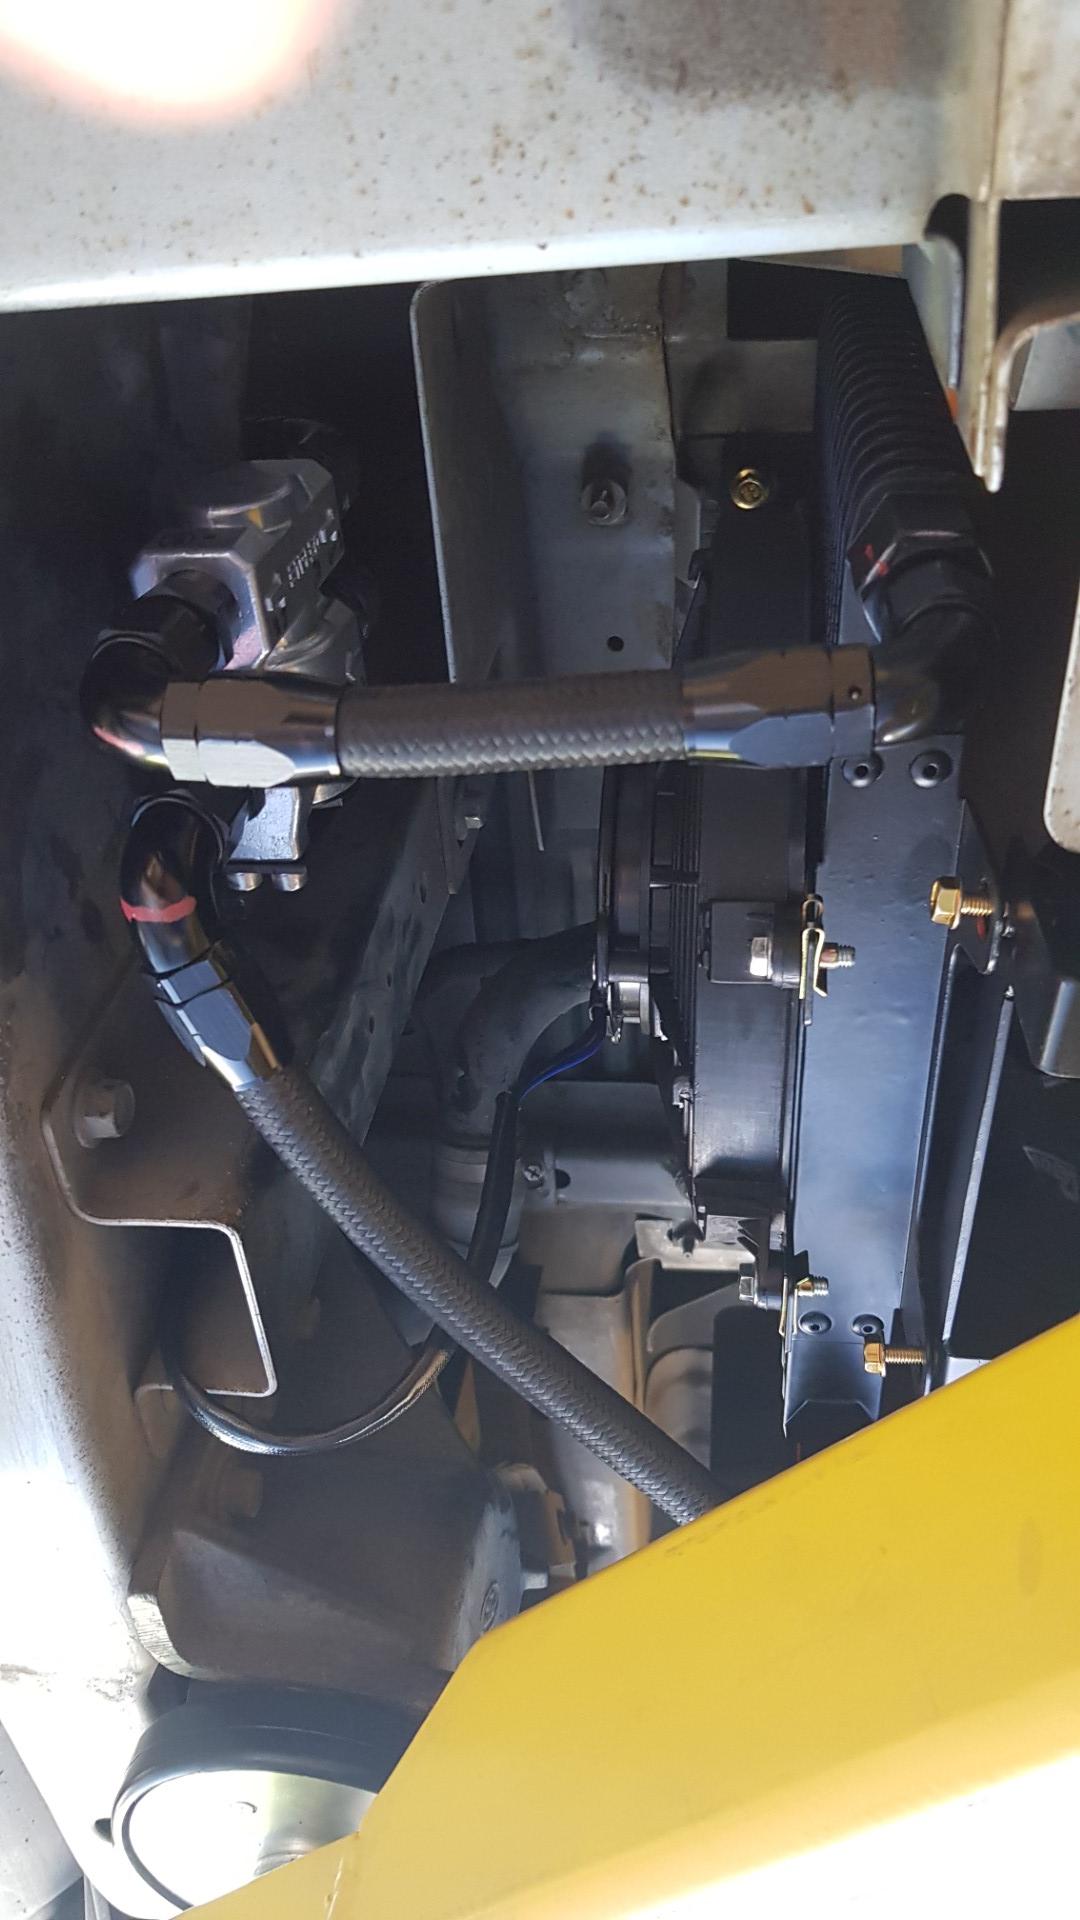
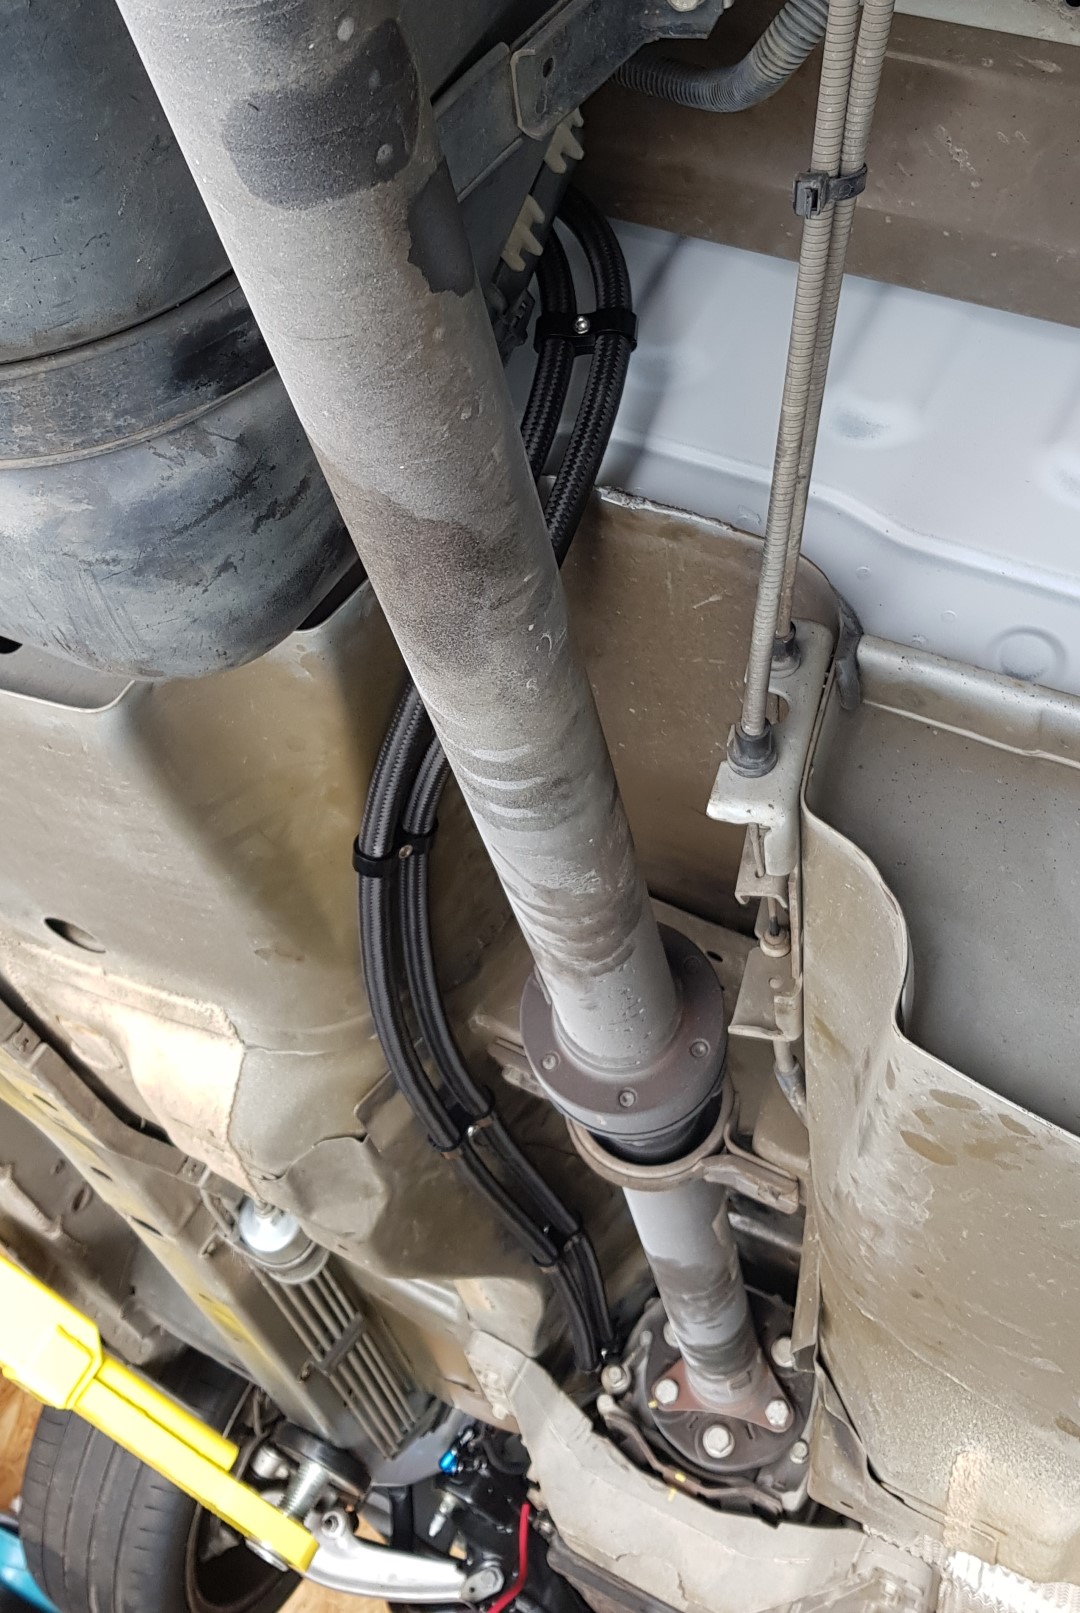
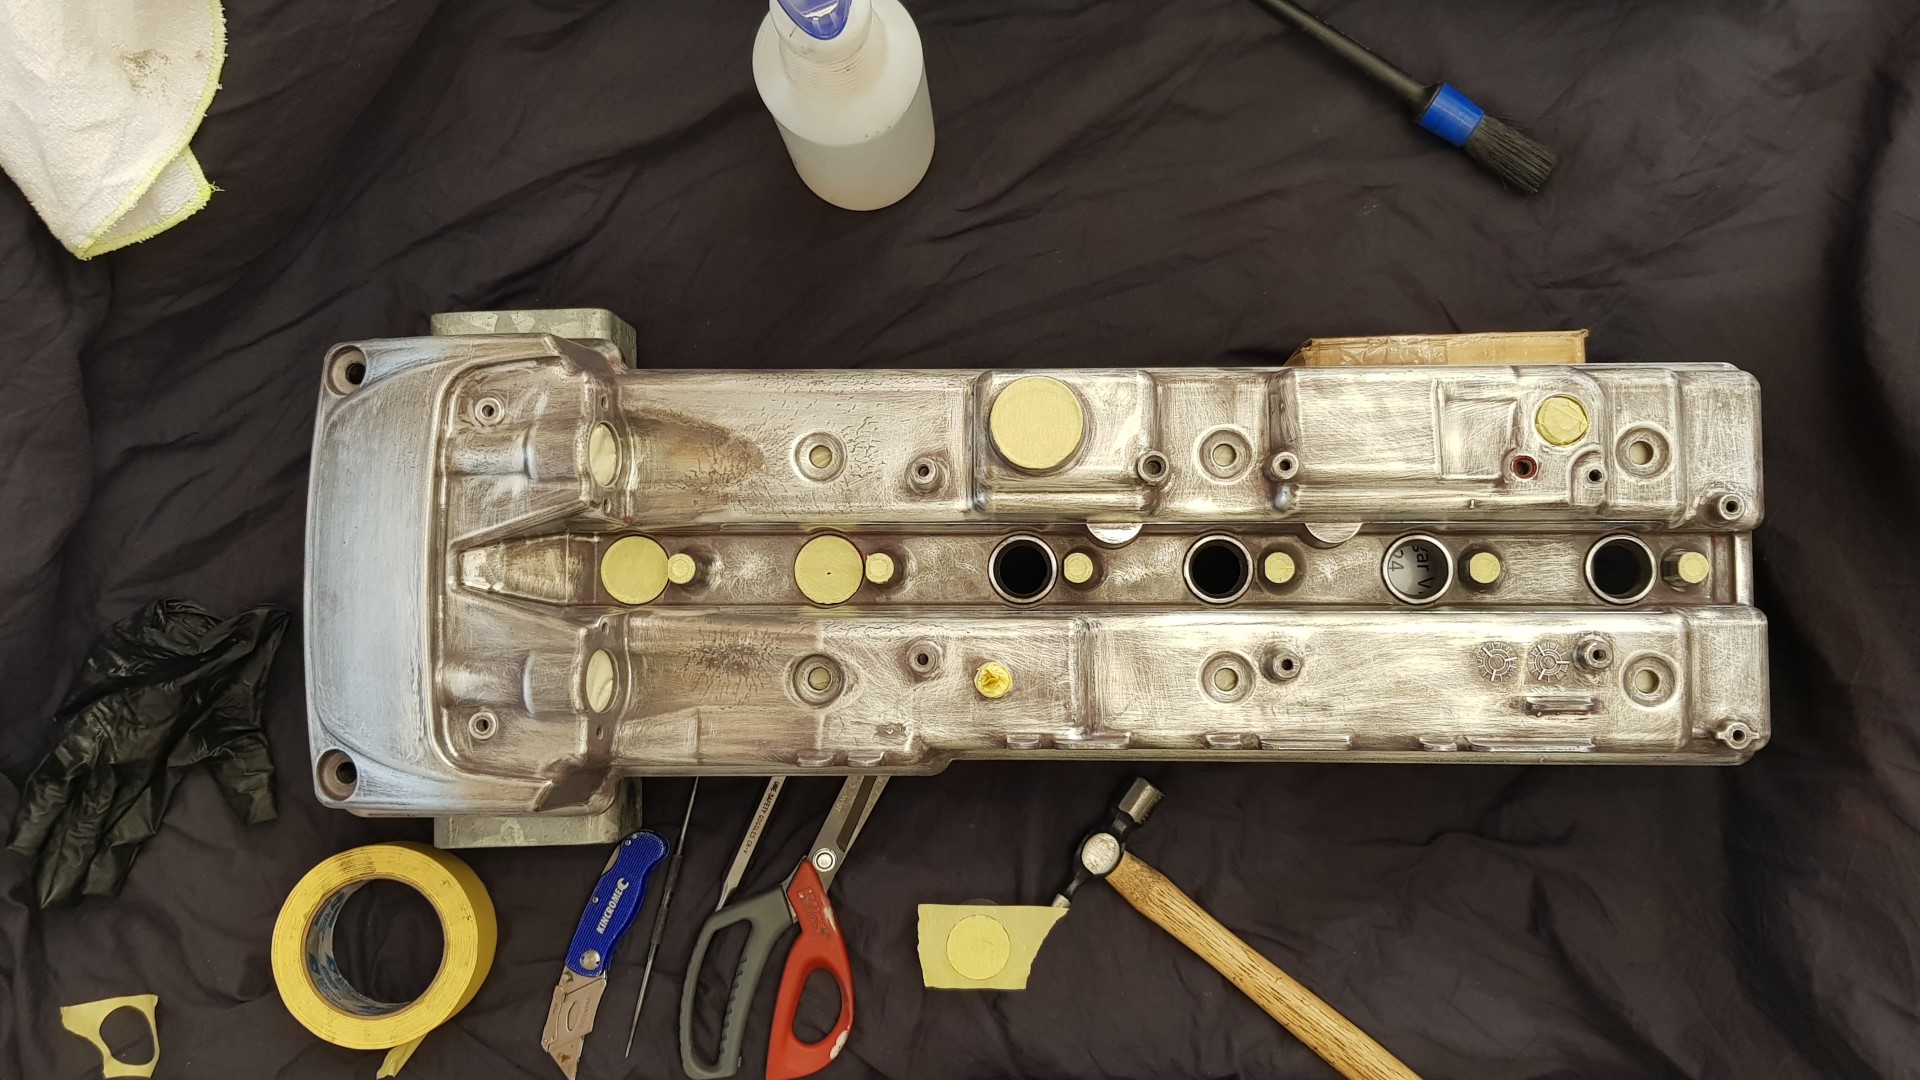
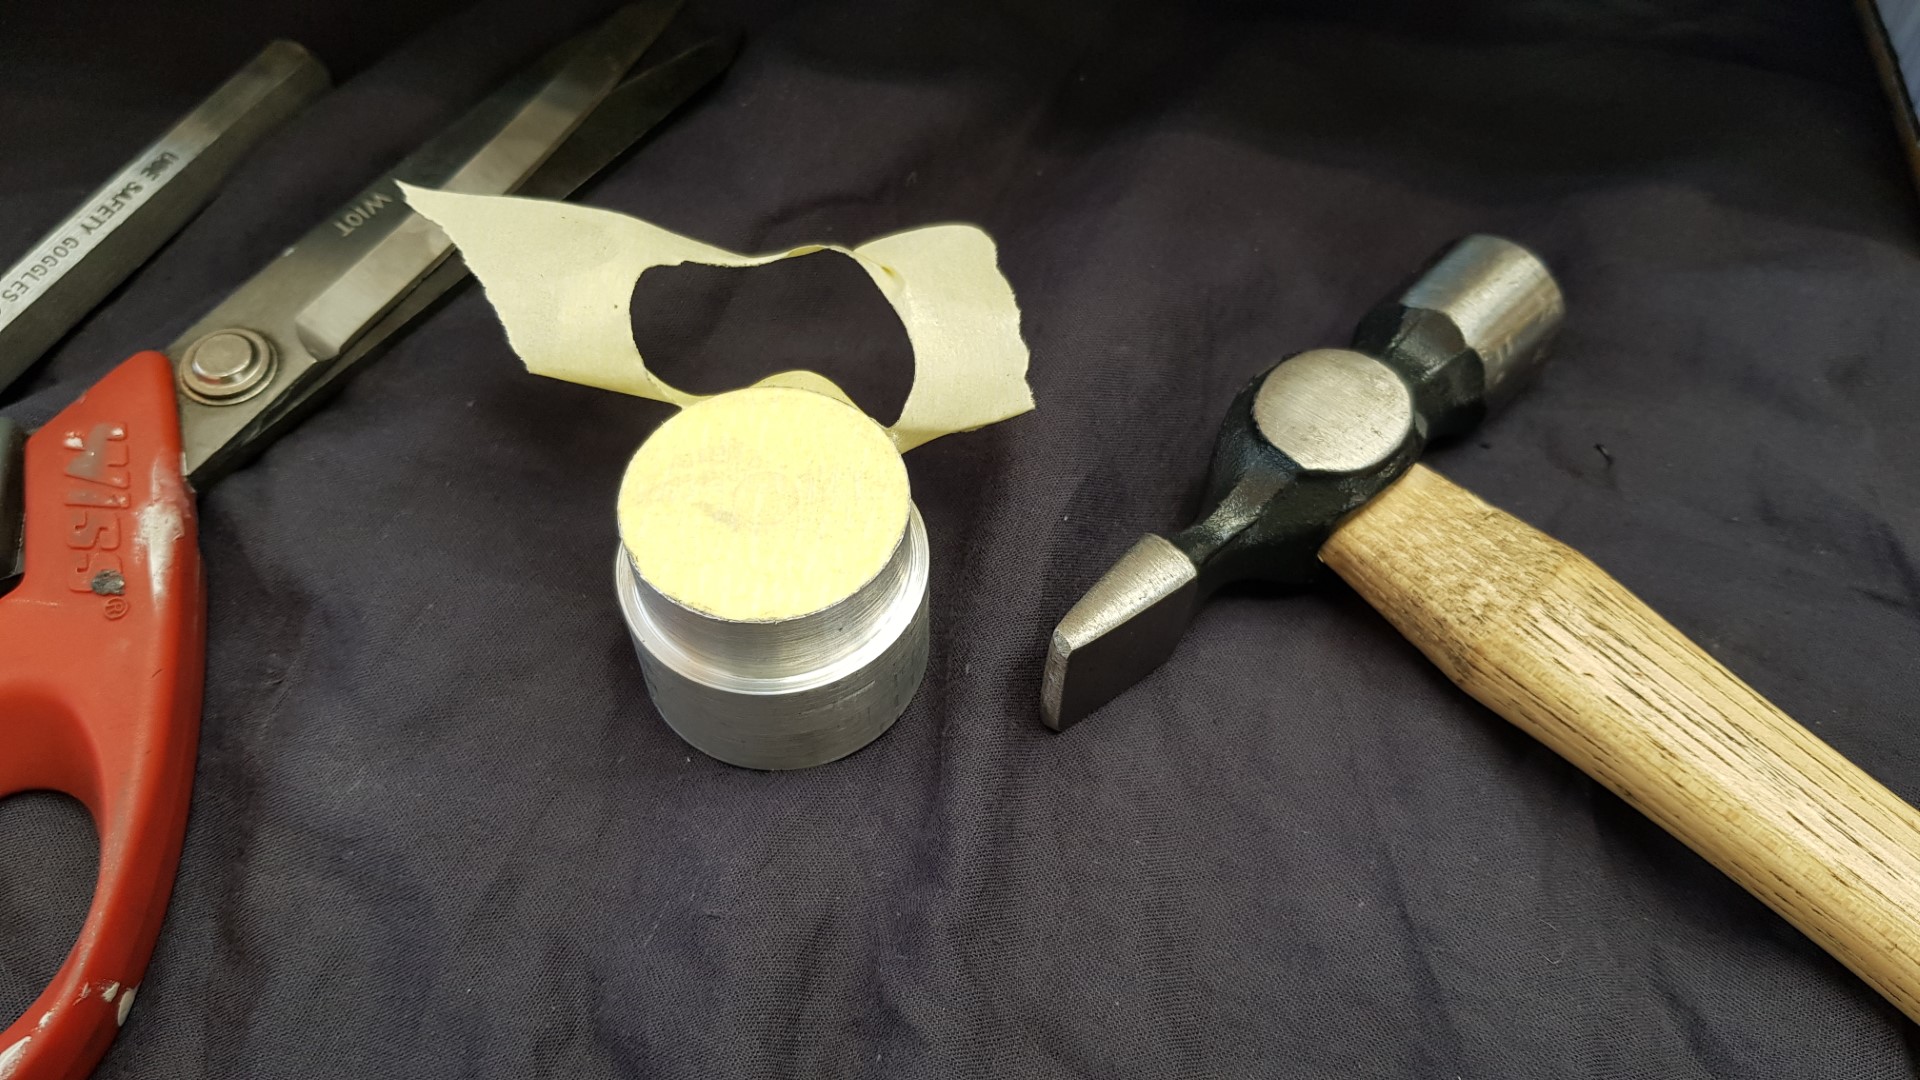
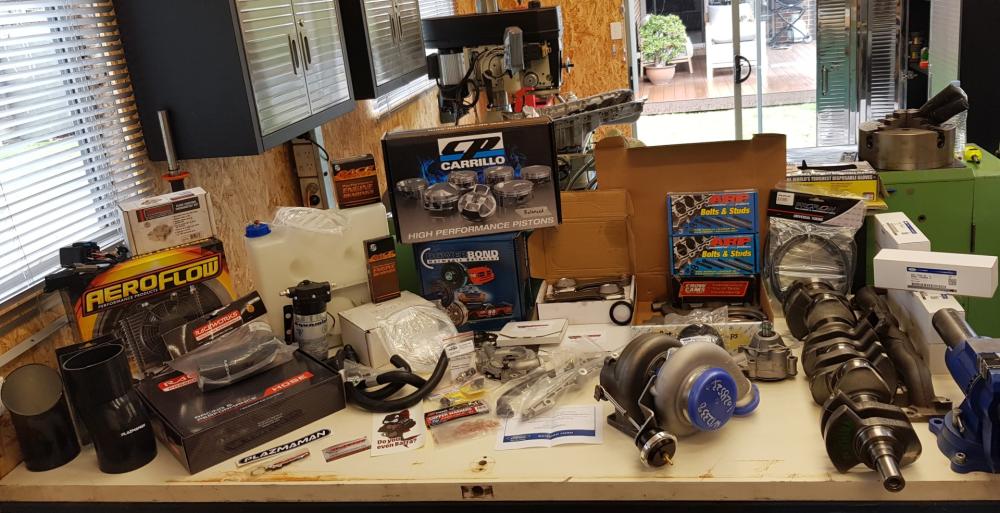
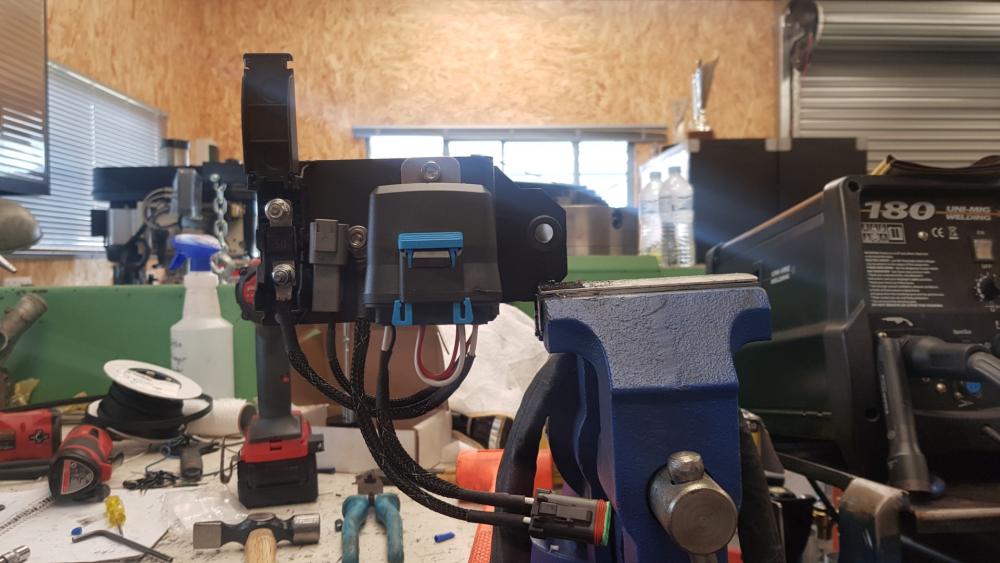
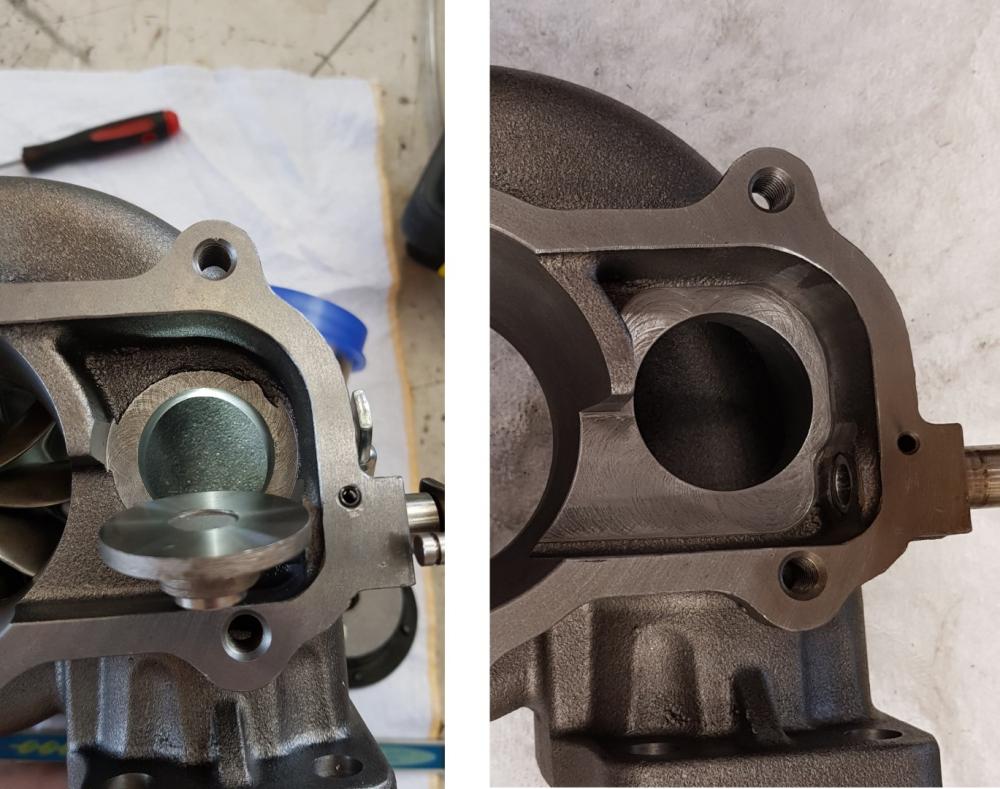
Goodness, everyone's got a fair bit on. Puffwagon is kicking goals with his build, great to see it finally coming alive after so long. As he gets closer to completing his journey, mine starts. Engine If you remember earlier a failed front cover oil seal ended up uncovering a massive can of worms that has resulted in a full rebuild. Fair to say I've learnt a lot since creating that thread, but there is so much more learning to come. Long story short, the cam was done, some of the rollers were done, some of the lifters were done, timing chain guides broken, cracked turbo exhaust housing, oval bores, main bearings end of life, pistons undersized. Basically she was a tired old girl. Still went bloody hard though and ran quiet as a mouse which is a testament to the robustness of the taxi engine. FG front cover oil leak - Engine Workshop - Ford XR6 Turbo.com I know @JETURBO like his workbench pics of his customers parts. He was the inspiration that I needed to do the blatant copy cat. I still think he does a better job, I'm no photographer. Lexi the dog is out for look. She always hangs around, love her to bits. And yes, I do mop my shed floors. Makes me want to get in and do a bit when the sheds clean. Hoping to get the ute into the 500rwkw club. Still stock ZF and driveline. Still rocking a 245 rear tyre which is my torque limiter device for gears 1 through 3. When choosing the pistons I elected to up the compression to 10:1. I bought an Aquamist kit to see if I can stay on 98. Will be placing a lot of confidence in the knock monitor when she's on the dyno. Went with the factory cams again, and retaining the stock exhaust manifold. Will be tuning this one myself. If anyone wants to know what it costs to go built motor with full service engine machining and specialist work, then screwing it together yourself as a kit set whilst paying retail for parts, don't expect much change out of $20k. Add another $__k for built ZF, driveshaft and built 9" diff. All machine work, balancing and dummy assembly for clearance checks was done by John at Powerhouse Engines in Warragul. He also supplied most of the hardware for the build. I'm attaching the spread sheet so anyone wanting to build there own motor can get the parts numbers and costs. Turbo Pulsar GTX3584RS with an at home modified port and flapper. See thread below for the build dairy. Flapper mod project - Turbo Workshop - Ford XR6 Turbo.com Only a 6mm diameter change but you can see visually how much bigger it is. Before and after shot Trans cooler Big Aeroflow cooler with built in fan. Also grabbed a Derale bypass valve 25719. This device keeps the cooler bypassed until the fluid temp is >80degC. The fan kicks on not far after that. The idea is to maintain a narrow temp range of trans temp so I am not fighting any temperature modifiers or thermal characteristics inherit to the transmission when dialling in the ZF tune. Likely no need to install it as none of the big players fit them, but it makes me feel better. Being a ute, the cooler went down the back. I ran a larger power cable down there than what I need to allow for possible fuel pump upgrades later down the road. There is also an ignition switched wire down there to enable the fan. Wasn't paying a fortune for the hose separators, flea bay to the rescue. Bought a 10 pack of separators for under $30 delivered. Quality was good too. Hose is Raceworks AN8 120 series and fittings are 100 series cutter. Found a nice waterproof fuse and relay combo box to house the fan relay. There is spare room in there for another fuse and relay for a fuel pump upgrade in the future. Went down the rabbit hole if using the over braid and heat shrink for looks. Bloody waste of time because you can't even see it once it's installed. Block Got to have some fun masking up the block and cam cover. Came out ok. Getting all the rust off is a pain in the arse. Went and got one of those multipack brass cleaning wheel kits and got into it with the battery drill. Allow half a day to clean and mask up. When masking the head, try and find something round to help mask off the spark plug holes. Makes it a lot easier. Also, if you didn't already know, use a hammer and LIGHTLY tap around the edge of the masking tape to make a perfect mask over bosses etc. Parts List.pdf


-
Bloody love your work Puff. I've just placed all my bits onto the bench to give Jet a run for his money on the parts photo. You ever thought about starting up your own shop? Or even creating a training course? There has got to be 800awkw in that build surely
-
Yeah, shoot. I realised that afterwards that the Makita was 40V. Apples and Oranges. Correction to my original post... Metabo 18V FOR THE WIN. Just bought a whole bunch of Milwaukee stuff lately too. Serves me right for jumping on the band wagon.
-
Makita for the win. Metabo a close 2nd. Bosch and Milwaukee absolutely no where. Good test. https://www.facebook.com/reel/814831416429711
-
Fark bro, still running her in and you've got that tank moving nice!!!
-
Awesome mate. It's been a long time coming. Boost hard, boost well.
-
That was me at 5.30 this morning. Shat the bed, couldn't sleep, mind racing thinking about car projects. Got in the shed made up a wiring loom for the meth kit.
-
Steve is making some good progress over in the US. Nice 1 piece girdle mock up.
- 1 reply
-
- 1
-

-
@g6efra, I'll save you even more time than Mrs JT's kind suggestion, just call him Monday and make a booking. Done.
-
Agree. Maybe in 2 plus years there'll be some good info available and build vids on You Tube etc so blokes like me can reference those to build my own box and have a source for the good frictions and 6R80 hard parts etc, as well as given a step by step on how it all goes together and where the clearances need to be at and what special tools are needed etc etc.
-
They also told me mine wasn't and quoted me a new shaft. Price was similar to what you got quoted. Had a go at it as had nothing to lose and got it done. Wasn't hard.
-
Was your original tail shaft not OEM? The centre bearing can easily be replaced on the OEM tail shaft.