Leaderboard


Popular Content
Showing content with the highest reputation on 28/08/19 in all areas
-
After being a gym junkie a few years ago I got tired and stopped going (turns out it was mainly my disease). The last few days have been a huge flair of my AS and the worst I’ve been in probably forever, (stuck in bed, stuck crying on the shower floor in pain etc) but instead of loading up on pain killers I decided to do something so hard and go to the gym. Movement is literally one of the only things that helps AS (due to its ability to reduce inflammation, strengthen your muscle taking load of your skeleton and also promoting movement stopping your ligaments and tendons turning to bone) but it’s so hard to do when you’re sick, but ironically that’s the most important time to do it... so anywhoooo have been to the gym three times already this week and feel like it’s already pulling me out of my slump. My lifting ability varies so greatly when I’m unwell and today after feeling better already I am over 7kgs up on chest press from three days ago just due to less fatigue. Trying to drag yourself to the gym when you feel like you can’t even get out of your bed is something so hard to do... but I did it which is a huge win psychologically as well and now it’s making it almost fun again to go. Oh and also like month number five or something without alcohol mmfg For those who TLDR: basically back back at the gym... despite how hard it was due to being so sick... but because I have been going it’s making me less physically sick and I don’t drink anymore. Small wins.2 points
-
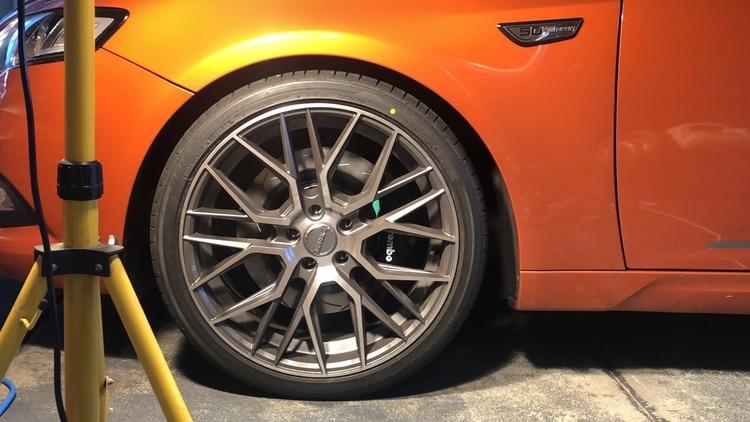
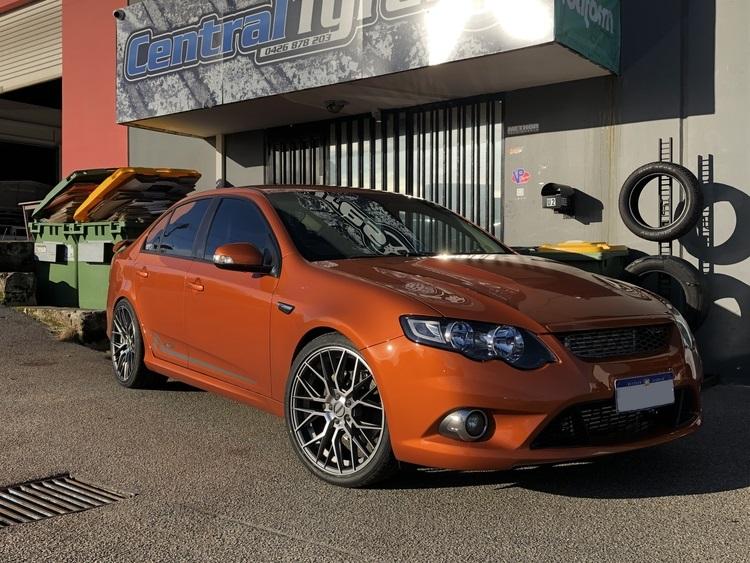
Rims: Hussla 'Lit' Fronts: 20x8.5 +20 Rears: 20x10 +40 Wheels: Bridgestone R050 Fronts: R20/30/245 Rears: R20/30/275
 2 points
 -
Thata boy! 'Last of the updates' - we'll see
 2 points
 -
377,377 as of last week...2 points
-
It's been a while since I have had time to work on this project. Life keeps getting in the way. Here is the progress I have made this past week. I made an engine leveling plate that attaches to the front of the motor put of some scrap steel I had lying around the shop, and I used simple chains for the back side of the motor. Once I had the motor centered between the frame rails, leveled left to right and tilted enough to clear the bellhousing, all that was left was to make the motor mounts. I know Tuff Mounts makes Mustang Barra motor mounts, but I have a welder, CNC plasma table and way more spare time than I have spare money, so I made them myself. I am also one of only a small handful of Barra importers in the country right now, so offering my own motor mounts is just good business.2 points
-
Been on the Lite N Easy for the last week. I'm enjoying it - I don't have to plan meals, go shopping for food or cook, it's calorie controlled and it's a lot healthier and cheaper than uber eats!1 point
-
Good stuff Dani!1 point
-
1 point
-
Doubt it. Call Ford1 point
-
Pussy! 550+ on 98 was no e85 when I built my first 32 with a t78 rb love 😍1 point
-
It sure wasn't on the around...1 point
-
No, I buy Gulf Western in 20L drum.1 point
-
Closing up the large leak in the oil pan.1 point
-
The motor is in position supported only by the motor mounts. Unfortunately I had to notch the oil pan to clear the k-member. The motor clears the sock hood BARELY. I had to notch the oil pan and space the k-member down 1 inch to make it fit under the stock hood, but it was worth it.1 point
-
The "Final Product" the quotation marks are because these are only used to make a jig. The final product will all be TIG welded and and much prettier, so don't judge these welds too harshly.1 point
-
Follow along with the motor mounts as I make them.1 point
-
And there ya have it. BOOM!! #Mic drop, walk away. Another life saved... Fark that's a sexy piece of machinery.1 point
-
playing around with things to fix boost control.1 point
-
@JETURBO - please sort something out for him1 point
-
Advice re: 10 inch rims on FG+ sedans (fitting within guard). I purchased the Superpro Rear Blade Control Arm Kit (Extra Clearance). It’s pricey, so my tip is to sign up as a trade member at supercheap and you should be able to get it around $850. The Superpro website suggests that wheels of the following specifications should be ordered to suit their kit: - 19 or 20 inch rims x 10 inch wide - with an offset between + 52 and + 55 - to fit a 295 or 305 tyre. Relying on the advice on the Superpro website I ordered my Work Emotion CR2P wheels to the following specifications: 19 x 10 + 55. As seen below when fitting the rim the distance between the shock and rim is a matter of a few mm - keep in mind this will increase as the suspension is compressed as the vehicle is lowered. So no need to worry about that. The main concern will be clearance from the shock mounting bolt as this is what will come closest to the wheels when the suspension is compressed. Upon reviewing the instructions in the packaging (which were in fact different to what is stated on the website) it was suggested a maximum offset of +51 should be used. As the wheels were a 16 week special order I couldn’t ring Stav from down the road and ask him to adjust the offset for me by a few mm. I had no choice but to order a 4mm spacer. I did so through BSA wheels in Sydney who custom machine spacers. The spacers are machined hub centric and with an extended spigot ring to locate the rim onto the hub. I was surprised by the quality and fitment of the product (~$120 for pair). Being 4mm in thickness I don’t have any safety concerns here. Also, the top shock bolt is now a few mm further away from the tyre when suspension is compressed. As seen below, rear blade control arm clearance of the control arm is no longer an issue with a wider rim. I decided on MT ET Street S/S tyres with 285/35 tyres. As to width. (mudguards since removed). As to guard clearance, the combination does not foul on the the guards whatsoever. There is a visible clearance of at least 4mm to the outer guard. In summary, I cannot offer advice on 20 inch rims. For 19 inch rims I would suggest the following when using the rear control arm shown above: 19 x 10 + 51 paired with a 285 tyre. If you want to use a 295 or 305 check how much wider that would be as compared to a M/T ET Street S/S as I feel this tyre is pushing the boundaries of what would fit next to the top shock mounting bolt. In terms of traction, this setup is a dream. Manual in excess of 500rwkw and it simply does not lose traction. Saying that I have a number of other suspension changes to assist (wavetrac, shockworks, full bush upgrade). Tyres at 20 psi when seeking maximum traction which I bump up to 30 psi for longer drives. hopefully this saves people a lot of ****ing around because getting this right drove me crazy. a lot of $$$ for 10mm extra width on both sides and that’s a valid point, but do not regret it whatsoever as I love the setup,1 point
-
The Boys add blocker etc https://gomovies.sc/tv/the-boys-season-1/watching/?ep=39059&sv=91 point
-
Hummm tuff one mate all of the above will have slight benefits unless your existing parts is not performing well the hot side piping upgrade will reduce air speed as it’s overall bigger OD but gain a bit uptop but loose a bit down low the Rapid systems intercooler is a reasonable unit so to get a good gain the replacement unit must be top spec FG exhaust manifold will be negligible imho but you might just change the power generation graph like the hot side pipe will the exhaust could be the biggest peak gain for dollar in this list especially if your twin 2.5* is an older unit the actuator will do bugger all unless you’re having boost control issues uptop ? Same for the boost controller just sayn1 point
-
Talking about updates, after my second round of mods (too numerous to mention) the end result was 958NM @ 4188 and 364.6 @ 5188. At the Geelong Revival last November I had some teething issues but managed to get one decent run with a 11.1. Switching now from BP Ultimate to United E85. It will be interesting to see what gains can be made.1 point
-
Big news everyone! I finally have all the equipment necessary to start building my YouTube channel. I have already started filming on one of my projects. I'm in the process of editing the footage I have and will have episode 1 of the 1987 El Camino 6.0 LS swap. I'll have some footage showing me modifying the Barra oil pan for my Foxbody. Subscribe to my channel. Once I have 100+ subscribers I can get a custom URL that will be a lot easier to find. Obviously I am just starting this, so plese bear with me and hopefully my channel will grow fast with good quality car content. https://www.youtube.com/channel/UCpMeSVPUMtmAOTwFGpSUAJQ?view_as=subscriber&fbclid=IwAR3Gr6Psc2i4sL2aZQ7WnARrnRe4wvLtZU12HPSIaKYN7nsaT3CUCvRjhEM1 point
-
I removed a "small" chunk from the BA/BF front sump oil pan. I also removed the front sway bar. Now it fits, even with the steering rack in place. IT FITS! The stock hood even closes (barely but that still counts). I am probably going to space the k-member down with 1 inch spacers. This should improve hood clearance, and help with my drive line angle a little. I'd like to see the motor "tilt" a little forward, nose down another 2 0r 3 degrees. 1 inch spacers are not going to give me any handling issues. I'll be able to adjust the suspension with back into spec. Adjustable coil overs, caster/camber plates, offset steering rack bushings and bump steer eliminators are common mods already really common. I have 3/4" spacers in my 5.4 4V 96 Cobra and it handles like its on rails.1 point


-RABS4K.thumb.jpg.eb7f5cabb2776d08d3d8f0475f8ef966.jpg)


This leaderboard is set to Sydney/GMT+11:00