Leaderboard


Popular Content
Showing content with the highest reputation on 13/05/15 in all areas
-
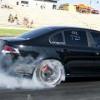
Finally got to a retune after fitting the powerglide and wound the boost to 23psi and I broke the 500+ club. The cars transformed a bit from a street car, into just a weekend racecar. Really happy with the power figure, its running a 4800rpm Converter, Powerglide and a 9". We dynoed it with the 275 ET streets on which was well interesting, it baked them on a run and lost half my tread with it. Now we take it racing and see what it really will mph. With 19psi it ran 153mph but it didn't have a cage then so we have added a touch of weight.4 points
-
Ok I think I've got it sorted [emoji51] Discovery 1 ; I contacted one of the previous owners about the red button (unfortunately it wasn't too enable the "cop chip") and luckily he could remember that it was a panic alarm that was connected to a GPS Tracker. Since he sold the car on the GPS has been lying there dormant for the last 5 or so years.(BIG thanks CHALAXAN you're a champ[emoji7]) Discovery 2 ; So I started removing bits of interior and found the annoying little FARK of an alarm that's been driving me crazy. I also found some other bits and pieces, one of which I assumed was the tracker. But there were a lot more wires feeding into the cars loom than I anticipated [emoji15] Now this unit had a fuel pump cut off which let the people tracking the car to shut it down whenever they wanted to. Discovery 3 ; Studying all of the wiring, I couldn't understand why a lot of the wires were feeding into a loom that ran to the back of the car. After a while I realised that the loom didn't look like Ford put it there so I started tracing it to the rear of the car. More bits of interior removed and the back seat out lead me to the next discovery. Discovery 4 ; Down in the rear RH passengers footwell was a puddle of water[emoji15].....WTF[emoji35]!!! Now us Eastcoasters have had a Sh!tload of rain over the last month but still .....a FARKN PUDDLE??? Further investigation revealed the source, the RH rear passenger window was ever so slightly cracked open ......BLOODY KIDS FFS!!! The windows probably been like that for months and I haven't noticed. Discovery 5 ; Anyhow moving along I found under the sodden carpet the silver box you can see in the photo sitting in water... It also had a 6 volt battery next to it and an antenna that lead up into the seat foam. The GPS wiring didn't actually bypass any of the cars wiring that I could see so after careful consideration I just cut all the wires that spliced into the loom and hoped for the best! Battery reconnected and she fired up straight away [emoji108] Took her for a drive around the block and all good. Refitted the car alarm siren thingy and all good. I'm not entirely sure how the GPS communicated with the rest of the car but I think it must've told the cars computer to stop the pump somehow ? I suppose the GPS didn't like being drowned in water for a few weeks. Hopefully this fixes my flat battery problems [emoji26] Now where are those bloody kids???4 points
-
Sold, we already purchased another house a little further south which had passed through finance a few days a go so we were waiting for the couple that purchased ours to get their unconditional approval. Even though they were borrowing under 80% it was a stressy time.4 points
-
Both pairs of front calipers reassembled. I’ll be selling these, so will leave the decals off until they get fitted to a car. I bought replacement decals on eBay but haven’t put them on yet. There are four options: - Put decals on and then clear powder coat the calipers. However, there’s the risk that the heat from powder coating will damage the decals. - Put the decals on and then clear coat the calipers with an aerosol can. However, this could result in the same discolouring that happens when the clear coat on Brembo calipers burns off or fades. - Put the decals on but not coat the calipers at all. This means that a high pressure washer will blast the decals off, but the decals can be easily replaced whenever required. - Leave the calipers as they are and don’t apply any decals. For putting the bleed nipples back in I used a six-sided socket to ensure that I didn’t damage them. Putting the banjo bolts back in. I’ll be putting new copper washers on later. The rear calipers before reassembly. It was a bit challenging at times to fit the seals into the small diameter bores but everything went together fairly easily. The rear calipers reassembled. The inner side of one of the rear calipers. The outer side of one of the rear calipers. One of the front pairs had 40mm and 44mm piston, and the other pair had 36mm and 40mm pistons. However, both pairs had the same part numbers on their respective halves. If you’re going to fit new seals and dust boots to a set of Brembo calipers then it would be worth confirming the piston diameters before making any assumptions on what sizes to order. This is the inner half of one of the non-burnt calipers. The same part number, on the inner half of one of the calipers that had been burnt.4 points
-
Google is free as well, for the slower setting And Australia is one of the few country's that limit downloads/uploads Sucks gorilla d!ck3 points
-
we spoke to a guy today that paid $500 for his custom tune, his car was in the shop for half an hour apparently, probably why he's ringing around trying to get it running well3 points
-
Go the housing world. Received a call from the bank that our finance is approved and should be all finalize late friday. YA! let the building begin.3 points
-
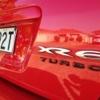
One has a fpv badge and the other has a ford badge.3 points
-
I tackled the valve body again last night, and just as I thought with a clear head it was just as easy as they claimed.. There's two halves, with a sandwich plate Inbetween, then the TCM.. I only got one half done last night, completely stripped it, gave it a Kero bath, blew it down for about 20mins making sure I got in every nook and cranny, changed over the factory plungers/Pistons for the Sonax ones with o-rings, then put it back together, and I'm feeling better about using new solenoids (not coz Bellend suggested it, but because I wanted to [emoji106]) Genuine solenoids $600 Genuine sandwich plate $117 Still waiting on the motor and dad spent 3hrs tipping the valves, still with 8 to go this afternoon.. About 0.03" had to come off each, not many people understand how crucial the correct Crush/lash is even with hydraulic lifters Thanks, Joe3 points
-
Good stuff on turning things around recently boys! I weighed 90.3kg this morning...so I've lost 31 kg since I first went to the doctor around Christmas. I've lost 25kgs alone in the last 8 weeks on Optifast! 15kgs to go fellas! I'm excited! Loving the reactions I'm getting from people atm! Caught up with some friends the other night and I walked in the door and was met with a "JESUS!" When she saw me haha. Been getting that a lot lately3 points
-
Glad to get a good news call from the husband/father of a woman and kids that I helped out of their crashed car this morning. No serious injuries, wife is under observation due to being I'd guess about 7-8 months preggo (she was driving). He gave me his thanks and said God bless me etc. Felt good to be able to help someone out like that even if it was a pretty stressful near miss on my own car going the other way.3 points
-
Last year I had a standard 2005 BA XR6 Turbo ute, which meant having the standard boring PBR brakes. I’m a brake geek, which meant when I saw a vague advert for some Brembo calipers on Gumtree I rang the number. I kept getting the seller’s voicemail, but kept trying each day (as did numerous other people). It turned out that that he’d been away for several days, and when I did get him on the phone I had literally just driven past the road that his workshop is on. I ended up buying a whole pile of stuff from a wrecked FPV BA Super Pursuit, including front and rear four piston Brembo calipers. They sat around while I looked for wheels that would fit over the calipers. I was also indecisive about just how much money I wanted to tie up in the XR6 Turbo ute. When I later saw another Gumtree advert for a pair of front four piston Brembo calipers I bought them as well. They were on the other side of the country (Sydney, and I’m in Perth) but a deal was made for the seller to post them to me. The advertisement read: “I have 1 pair of used Brembo calipers suit 360mm discs, they have come of a 2004 BA XR8 Falcon. Were in perfect working order when removed. Only reason for selling is due to upgrade.” When they arrived I realised that they had been on a car that had been badly burnt-out. This didn’t matter as I was planning on rebuilding them anyway, and I got them at a good price. I don’t think that the seller had much of an idea about brakes, including the disc size (ie should be 355mm, not 360mm). I’ve since sold the XR6 Turbo ute and now have an FPV Tornado ute. I’ve also bought a pair of six piston front calipers, which means that I no longer have a need for the four piston ones. However, I’ll be putting the four piston rear callipers on the Tornado. Someone had done a dodgy job with a spray can to make the calipers look red. There was overspray on the mounting brackets and the bleed nipples had also been painted. But it was obvious that the calipers had been subjected to extreme heat. -------------------------------------------------------------------------------------------------------- Replacement Seals & Dust Boots Although you can buy genuine Brembo parts here in Australia, they are expensive. They can be ordered a bit cheaper from the US, but there is a company called StopTech that also makes Brembo-compatible seals and dust boots. StopTech parts can be ordered from Zeckhausen Racing (the Caliper Rebuild Parts section) - http://store.zeckhausen.com/catalog/index.php?cPath=82 Their general web site, particularly the Technical section, has a lot of useful information about brakes - http://zeckhausen.com Some relevant part numbers for Brembo calipers that are used on Falcons and FPVs: Seals 28mm Brembo Part No: 05.5955.52 StopTech Part No: 753.99000 30mm Brembo Part No: 05.5955.53 StopTech Part No: 753.99001 36mm Brembo Part No: 05.5955.56 StopTech Part No: 753.99003 40mm Brembo Part No: 05.5955.58 StopTech Part No: 753.99005 44mm Brembo Part No: 05.5955.60 StopTech Part No: 753.99007 Dust Boots 28mm Brembo Part No: 20.4872.40 StopTech Part No: 750.99000 30mm Brembo Part No: 20.4872.41 StopTech Part No: 750.99001 36mm Brembo Part No: 20.4872.44 StopTech Part No: 750.99003 40mm Brembo Part No: 20.4872.46 StopTech Part No: 750.99005 44mm Brembo Part No: 20.4872.48 StopTech Part No: 750.99007 -------------------------------------------------------------------------------------------------------- Rebuilding Brembo Calipers - Summary: - Not a difficult job. - Take lots of photos and write notes during disassembly - you might need to refer to them for reassembly. - Cheap and very much worth doing. The difference in apearance is huge. - If you’re buying a set of secondhand Brembo calipers then this is worth considering before fitting them to the car. -------------------------------------------------------------------------------------------------------- Part Numbers & Bolt Specifications Part Numbers - Front Calipers (on the inside, above piston): 20.7678.01 1A (outer) 20.7679.01 1A (inner) Despite the different piston sizes, the part numbers on both the 36/40mm and 40/44mm versions are the same. Part Numbers - Rear Calipers (on the inside, above piston): 6972 (outer) 6971 (inner) --------------------------------------------- Part Numbers - Front Brackets: 20.A002.01 and 20.A002.02 19.7681.18 and 19.7681.19 Part Numbers - Rear Caliper Brackets R20.8415.90 - both sides Bolts - Caliper to Bracket Bolts Front: 70 x 1.5 x M12 Quantity: 2 on each caliper Bolts - Rear: 55 x 1.5 x M12 Quantity: 2 on each caliper --------------------------------------------- Caliper Pad Springs & Pins 2 x front springs, 4 pins 2 x rear springs, 4 pins Caliper Connecting Bolts Front: 90 x 1.75 x M12 Quantity: 4 per caliper Rear: 75 x 1.75 x M12 Quantity: 4 per caliper -------------------------------------------------------------------------------------------------------- One of the pairs of front calipers had been subjected to a substantial amount of heat (ie fire, not hard braking). However, the metal blocks were still in their original condition, meaning that the calipers could be restored. To start the disassembly process, I removed the brake pads. The pads are held in place by two metal pins, which are held in place by two cotter pins. The dust boots had been burnt away in the fire, so there was nothing to be removed. However, I could see a small groove to assist in removing each dust boot. Once the pads were out I had to figure out how to remove the pistons. This is normally done by subjecting them to a sudden blast of air into the caliper from an air gun. I don’t have one, so tried a portable tyre compressor. I put one of the pads back in to prevent the pistons from flying out suddenly and rolling off into some distant corner. It turned out that the pistons on the burnt calipers were easy to remove - they just slid out. I knew that I had to order new seals and dust boots, so measured the pistons. For pistons that I couldn’t remove with my fingers I used a pair of multi-grip pliers. Once I had the pistons out I could see why it was so easy to remove them. The brake seals were ash. At this point I was quite amused by the “were in perfect working order when removed” comment in the advertisement for these calipers. Once I had the pistons out I started separating the metal blocks. Each caliper is held together by four bolts with a 10mm allen key head on each one. Once I got the first one apart it was becoming obvious just how simple these calipers actually are. I still can’t figure out why these things cost so much.2 points
-
2 points
-
Well I got a bit bored and surprised jet with tapas tonight This is the menu (I am lame and surprised tranny fhuker with a menu) And these are the pics (Potentially over did the amounts) Dessert to come2 points
-
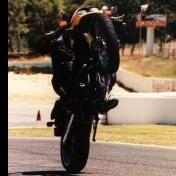
Me chopping a 500 AWKW R32 GTR at Sydney #54... It's a great weekend but very very hard on your car...2 points
-
Just ordered a few goodies for the ute. 20% under driven harmonic balancer Solid engine mounts Billet tail shaft coupling2 points
-
Dirty boat anchors don't make enough torque for shift reduction to be required.2 points
-
2 points
-
^^^ Have to disagree! Surely the roof racks and "cop" antenna are your best mods. And when the caravans hooked up it looks absolutely MINT!!! The power mods are overrated lol[emoji23]2 points
-
Having a relaxing breakfast in Shanghai, glad the flying is over with for a few days. Time to soak up the local atmosphere. Drive from airport last night was a spin out, spaghetti highways that seemed about 10 stories high! Fantastic neon skyline from the room.2 points
-
I think one is red and one is blue. that's all I know.2 points
-
Just picked up these set of heads...... Golf ball in inlet valve pocket to give you an idea of size. Golf ball in inlet port These are a pair of the "legendary" BIG Port 4V Cleveland heads that Ford ran in the late 60s to early 70s GTs. They were sitting in a shed for the best part of 30 years and now Granddad has passed on he no longer needs them(not my Granddad). Although they look a little ugly, they are in very good original condition and will clean up very nicely. I'm going to use them on my Boss 302 Windsor build along with the weber setup I bought previously below..... It's an awful lot of port for a 5 litre V8 but it's what they ran back in the day and keep in mind the BOSS 302 was the most powerful 5 litre V8 Ford made for over 30 years so I'm sure it'll go reasonably well.[emoji6]2 points
-
1 point
-
The pressure is on now Gunna ! Which Tunna will hit the road first ! he he1 point
-
1 point
-
You don't make friends with salad lmao1 point
-
I was the same mate, but once a house becomes your own you learn to take care of it and have pride in it. I would piss and moan when the old boy would stop off at bunnings to grab sh*t but now its all I ever seem to do and I feel like its a paradise.1 point
-
Hi Brendan hi brendan1 point
-
Pistons better quality cast in F6 - valve springs and everything else internal the same.1 point
-
Mate you don't need to thank me. You need to give yourself a pat on the back for being able to stick to it!!1 point
-
if fuel pressure remains the same and your car wasn't previously tuned trying to band aid a poor fuel system, then this system shouldn't need a retune. However, id recommend getting it on a dyno just incase.1 point
-
Injectors need to be flow matched at multiple points on their charecter curve. To flow match them at full open flow has no benifit as the injector is not actively pulsing.1 point
-
Shanghai rocks. Get you ass to the Blue Frog for expats if you have worn out locals1 point
-
My FG never did it ....1 point
-
Ok update in relation to my vivosmart Went to Garmin Aus yesterday, I walked in with what I think was the right attitude, clearly stated why I haven't got the receipt or packaging, and had a smile on my face. About 10 mins later I walked out with a brand new unit! They were fantastic! Can't talk them up highly enough! So I'm looking forward to getting back on the wagon today, hitting the gym and gettign back into the swing of things. 188cm, 104.2 kg as of this morning.1 point
-
The pad retainers. I started by putting the pad retainers back in, after sorting out the retainers for the front and rear calipers. I had tried spreading everything out on my bed so that I had enough space to lay everything out, but it was quickly obvious that I’d have to move to my desk. One of the front calipers. I had the pistons, seals and dust boots lined up, ready to be fitted. The bores on the calipers were perfectly clean. I then started putting the seals back in. I put some brake fluid in a glass bowl (easy to wash later) so that I had enough room to dip anything in. Each seal got soaked in brake fluid before going back into its caliper. The seals were quite easy to put back in. After putting each seal back in I dipped my finger in brake fluid and wiped it around the bore to help with sliding the pistons back in. I rolled each piston in brake fluid before fitting its dust boot. This is why I chose that particular bowl for the brake fluid. Once the dust boot was on each piston, I dunked the bottom half of the piston in brake fluid before putting it back into the caliper. I wanted as much lubrication as possible to assist with sliding the pistons back in. One of the pistons, before being pushed back into the caliper. I made sure that there was plenty of brake fluid in place to help with this. After applying a bit of force to get each piston past the seal, they slid in quite easily. I used a new dust boot to replace one that I had previously damaged by not being careful enough during disassembly. To make sure that each dust boot was properly seated around the top of each piston, I held the dust boot with one hand and then rotated the piston with my other hand. The halves from one set of front calipers. There were then ready to be bolted back together. One pair of front calipers, bolted together. Then it was time to put the crossover pipes back on. The spacer foam had been cut off each pipe, so I put each foam back on. Now that the crossover pipe nuts were clean I was able to get them done up quite tight with a normal spanner. One of the crossover pipes in place. Two completed calipers. I’ll put the brake pads in later on. The various mount brackets also came back looking like new.1 point
-
1 point
-
I would do....things to Suzie D1 point
-
I prefer my push mower1 point
-
Coincidentally enough the odometer passed 266,666km on the way to my first job today, possibly very close to the time of the accident! @_@ Good news from the husband, everyone seems fine. His preggo wife is in for observation just in case though.1 point
-
Time for the next chapter!1 point
-
1 point
-
Finally you are listening to the right person! Good stuff mate, all we want to see now is progress pics and dyno sheets Then videos of tyres smoking!!! [emoji106]1 point
-
I'm with you captain, it's definitely not worth rushing, I'll still be going at the same pace, just putting in more hours if I can, that way if it makes it cheering, if not at least I tried, and there's no way I'll be taking it there if it's not run in 100% or if there's still issues... Barnz don't get me wrong, I am very much the same, I stoned each surface of the steels, and the two frictions had like 1% wear, plus this pack only controls Reverse, and low range if it were 4wd... I can live with that1 point
-
Our house in autumn1 point
-
So I didnt go ghetto, I picked up a new longer bolt high tensile, 90mm is all bunnings had but the non threaded bit was longer, so to stop the thread running out I packed it with some washers 5 x m12, did it all up and test drove. Still have a slight knock that is possibly due to the shock eye/bush not being completely uniform but there is no more rattle/ratcheting sound, so I am happy, if at any point it gets worse il have another go, but now at least we have found out what it is.1 point
-
Small update time Took it to the drags on the 98 tune and only managed a 12.3. the box wouldnt allow a shift into 4th So I went back to joe and got an 94 e10 tune in it She made 363rwkw.. pretty stoked with that Next on the list is the gearbox which should hopefully be done by the end of this year.. fingers crossed1 point
-
I'd suggest driveline related from the symptoms described. May be as simple as a throw tailshaft weight. Gets worse over time as harmonics set in and accentuate the movement.1 point
-
Most big tuners will have an arsenal of tunes and value files on hand from similar vehicles they have done. A tuner using SCT software should be able to grab a chosen base file / strategy file for the vehicle and import their own custom calibrations (normally saved as value files). You can build a rough tune very quickly this way, and from there it's just making minor modifications to suit the cars particulars. Just remember though....most tuners would have spent hrs upon hrs building their value file base, so even though it may only take a few hrs on the dyno for a good tune...your paying for intellectual property that the tuner has acquired over some time...yrs etc. If the car is on the dyno for 6 hrs....that's about 30 WOT runs (assuming you can load and run about 5 flashes per hr). That's a lot of dyno runs. Spending a total of 6 - 8hr's on a tune is acceptable IMO, but I doubt all of it would be dyno time...maybe half. In the end of the day, if they're spending all day on your car then they are most likely going to get it pretty sweet :-) In regards to the peanuts....most certainly holds true for tuning Stick with one of the big names and you won't be dissapointed I'm sure.1 point


This leaderboard is set to Sydney/GMT+11:00